
easy wood projects
As a kind of continuation of the last posting, this one is a snowman pin.

This little snowman pin is a very easy whittle, or could be a very easy carve with a rotary tool.
Materials needed:
Knife or rotary tool
eye punch or 22 caliber cartridge
1/4 inch thick basswood
safety glove and thumb quard
pencil
scroll saw or coping saw
white paint
black paint
orange paint
small artists brush
Pin back
adhesive to attach pin back
STEP 1
Start by drawing or tracing the snowman onto 1/4 inch thick Basswood, and cutting the blank out. Some times I leave a "handle" on the blank. Because of the small size of the pin its nice to have something to hold onto when whittling or carving. After the snowman is carved, the handle can be cut off.

STEP 2 Make stop cuts at the junction of the snowmans hat and the top of the hat brim, and at the bottom of the hat brim and the top of the snowmans face. Remove the corners of the snowmans hat and upper face up and down to the stop cuts.

STEP 3 Make stop cuts defining the top and bottom of the hat brim.
?

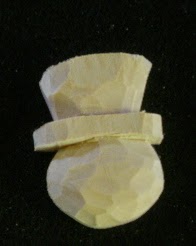
STEP 4 Remove some wood from the top front of the snowmans hat down to the stop cut. These cuts will begin to round the hat.

STEP 5 Remove some wood from the top of the snowmans face up to the bottom of the hat brim. These cuts will begin to round the snowmans face.

STEP 6 Round the snowmans face by removing small slices/chips of wood. Remove these small chips until all of the original flat surface of the blank is gone.

STEP 7 Round off the top corners of the hat and the hat brim.

Step 8 Thin the hat brim.


Step 10 The snowmans nose is supposed to be a "carrot". Use a dowel. and taper it to almost a point, to resemble a carrot. Then glue the nose into the hole.

Step 11 Use a round eye punch (I use a 22 caliber cartridge) and "twist" the eyes into the face. Dont worry about getting the eyes exactly even. With a thicker bladed knife, make the mouth and little half curves at the mouths ends.

Step 12. Finish the snowman pin. I scrub the pin with a denture brush and liquid dish soap (or use a woodburner) to remove any fuzzies. Let the pin dry, then apply a thin coat of shellac. After the shellac is dry apply the paint. Place a small dot of black paint in the eye outline (I use a tooth pick). After the paint is dry, apply a top coat of polyurethane. Finally attach the pin back.

Here are several variations of the snowman pin; all quite easy to accomplish. All will make a most popular gift. I make sure the waitresses at the diner all have one.

easy wood projects


0 komentar:
Posting Komentar